Scaling the Load Balancer
TL;DR
The load balancer distributes traffic across your servers. But what distributes traffic across your load balancers? This lesson covers the meta-problem — from DNS-based failover to Anycast to Kubernetes kube-proxy — and explains how production systems eliminate the LB as a single point of failure.
The Elephant in the Room
You've learned that a load balancer sits in front of your servers and distributes traffic. Smart move. But here's the question every interviewer loves:
"Who load balances the load balancer?"
If all your traffic flows through a single load balancer, you've just moved the single point of failure from your servers to the LB. Let's fix that.
Level 1: DNS-Based Failover
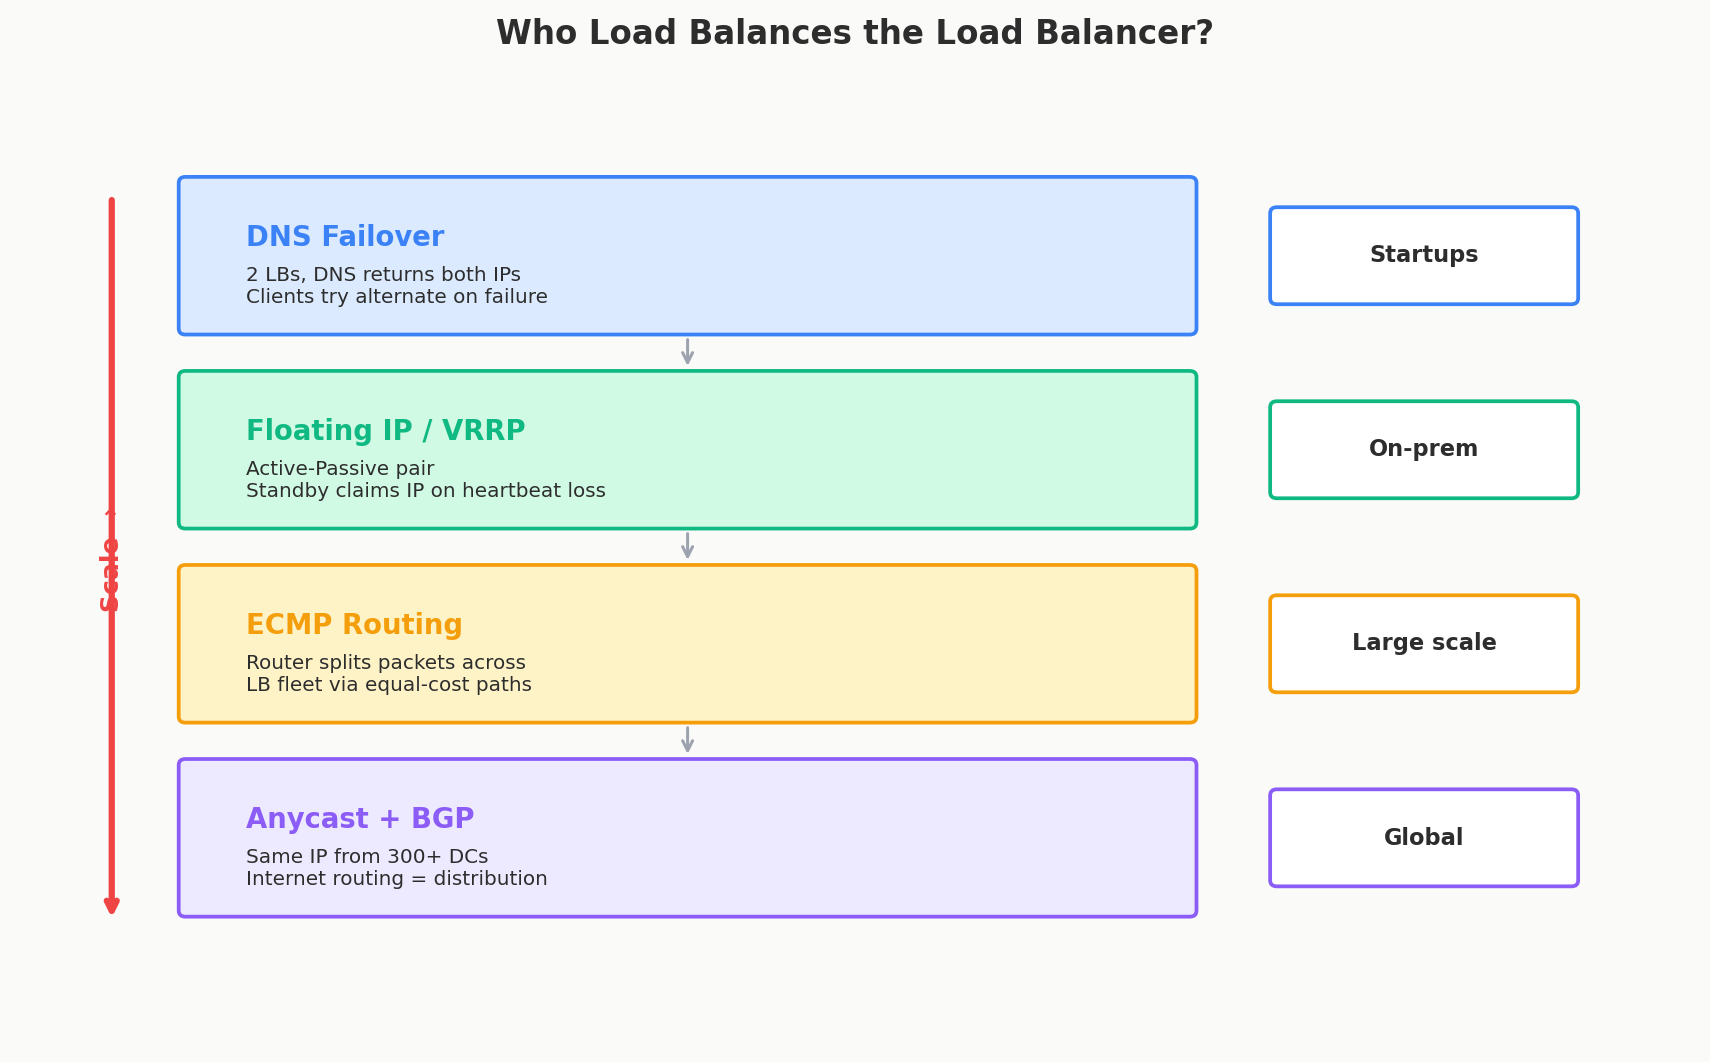
The simplest answer: run two (or more) load balancers and put both their IP addresses in DNS.
When a client resolves your domain, it gets both IPs. If one LB dies, the client tries the other. DNS TTLs control how fast clients discover the change — shorter TTLs mean faster failover, but more DNS queries.
The catch: DNS doesn't do health checking. If LB-1 dies, DNS still returns its IP until you manually update the record (or your DNS provider has health-check support, like Route53 or Cloudflare). During that window, some clients hit a dead endpoint.
When it works: Small-to-medium deployments where you can tolerate 30–60 seconds of partial failure during LB failover.
Level 2: Floating IPs (Active-Passive)
Run two LBs in the same datacenter. One is active (handling all traffic), the other is standby (sitting idle, just watching).
They communicate via a heartbeat protocol (like VRRP — Virtual Router Redundancy Protocol). If the active LB stops heartbeating, the standby immediately claims the shared floating IP and starts serving traffic. From the outside, nothing changes — the IP stays the same.
Normal:    Client → 10.0.0.1 (Floating IP) → LB-Active → Servers
Failover:  Client → 10.0.0.1 (Floating IP) → LB-Standby → Servers
                     (same IP, different box)
The catch: One LB sits idle, wasting resources. And you're still limited to the throughput of a single LB at any time.
When it works: On-premise deployments where you need fast failover without DNS propagation delays.
Level 3: ECMP — The Network Router as Load Balancer
ECMP (Equal-Cost Multi-Path routing) lets network routers split traffic across multiple LBs at the packet level. Your upstream router has multiple "equal cost" paths to the same destination, and it distributes packets across all of them.
This is how large-scale deployments (think: thousands of requests per second to a single VIP) work. The router hashes each packet's source/destination to pick a path, so the same TCP connection always hits the same LB.
The catch: Requires control over your network infrastructure. Not something you configure in AWS — it's a bare-metal / colo technique.
When it works: Large on-premise or colo deployments. Companies like Meta use ECMP to distribute traffic across thousands of L4 load balancers.
Level 4: Anycast — The Internet as Load Balancer
This is the nuclear option. Anycast means the same IP address is announced from data centers all over the world via BGP (Border Gateway Protocol). The internet's routing protocol itself sends each client to the nearest data center.
User in Tokyo  → BGP routes to Tokyo DC  → LB-Tokyo  → Servers
User in London → BGP routes to London DC → LB-London → Servers
A DDoS attack generating 2 Tbps of traffic? It's automatically split across 300+ data centers worldwide. No single location sees the full blast.
The catch: You need your own ASN (Autonomous System Number) and BGP peering relationships. This is Cloudflare/Google/AWS territory, not something you set up for a startup.
When it works: Global-scale traffic distribution and DDoS mitigation. Cloudflare's entire architecture is built on this.
The Hierarchy
| Scale | Technique | Who uses it |
|---|---|---|
| Small | DNS failover (2 LBs) | Startups, small SaaS |
| Medium | Floating IP / VRRP | On-prem enterprise |
| Large | ECMP across LB fleet | Meta, large on-prem |
| Global | Anycast via BGP | Cloudflare, Google, AWS |
Interview Tip
If asked "who load balances the load balancer?", start with the simplest answer (DNS with multiple LBs) and then escalate: "At larger scale, you'd use ECMP to distribute across an LB fleet, and at global scale, Anycast lets the internet's routing do the distribution." This shows you understand the full spectrum rather than jumping to a single answer.
Kubernetes: kube-proxy and Service Load Balancing
If you've ever heard "just deploy it to Kubernetes," here's what actually happens to your traffic underneath. Kubernetes has its own load balancing story, and it's one of the most commonly asked topics in infrastructure interviews.
The Problem Kubernetes Solves
In Kubernetes, your app runs as Pods — containers that can be created, destroyed, and moved across machines at any time. Pod IP addresses are ephemeral. You can't point clients at a Pod IP because that Pod might be gone in 5 minutes.
A Service is Kubernetes's abstraction for "a stable endpoint that routes to whatever Pods are currently running." It gets a fixed ClusterIP (a virtual IP internal to the cluster), and traffic to that IP is distributed across the healthy Pods behind it.
But who does the actual packet routing? That's kube-proxy.
kube-proxy: Three Modes
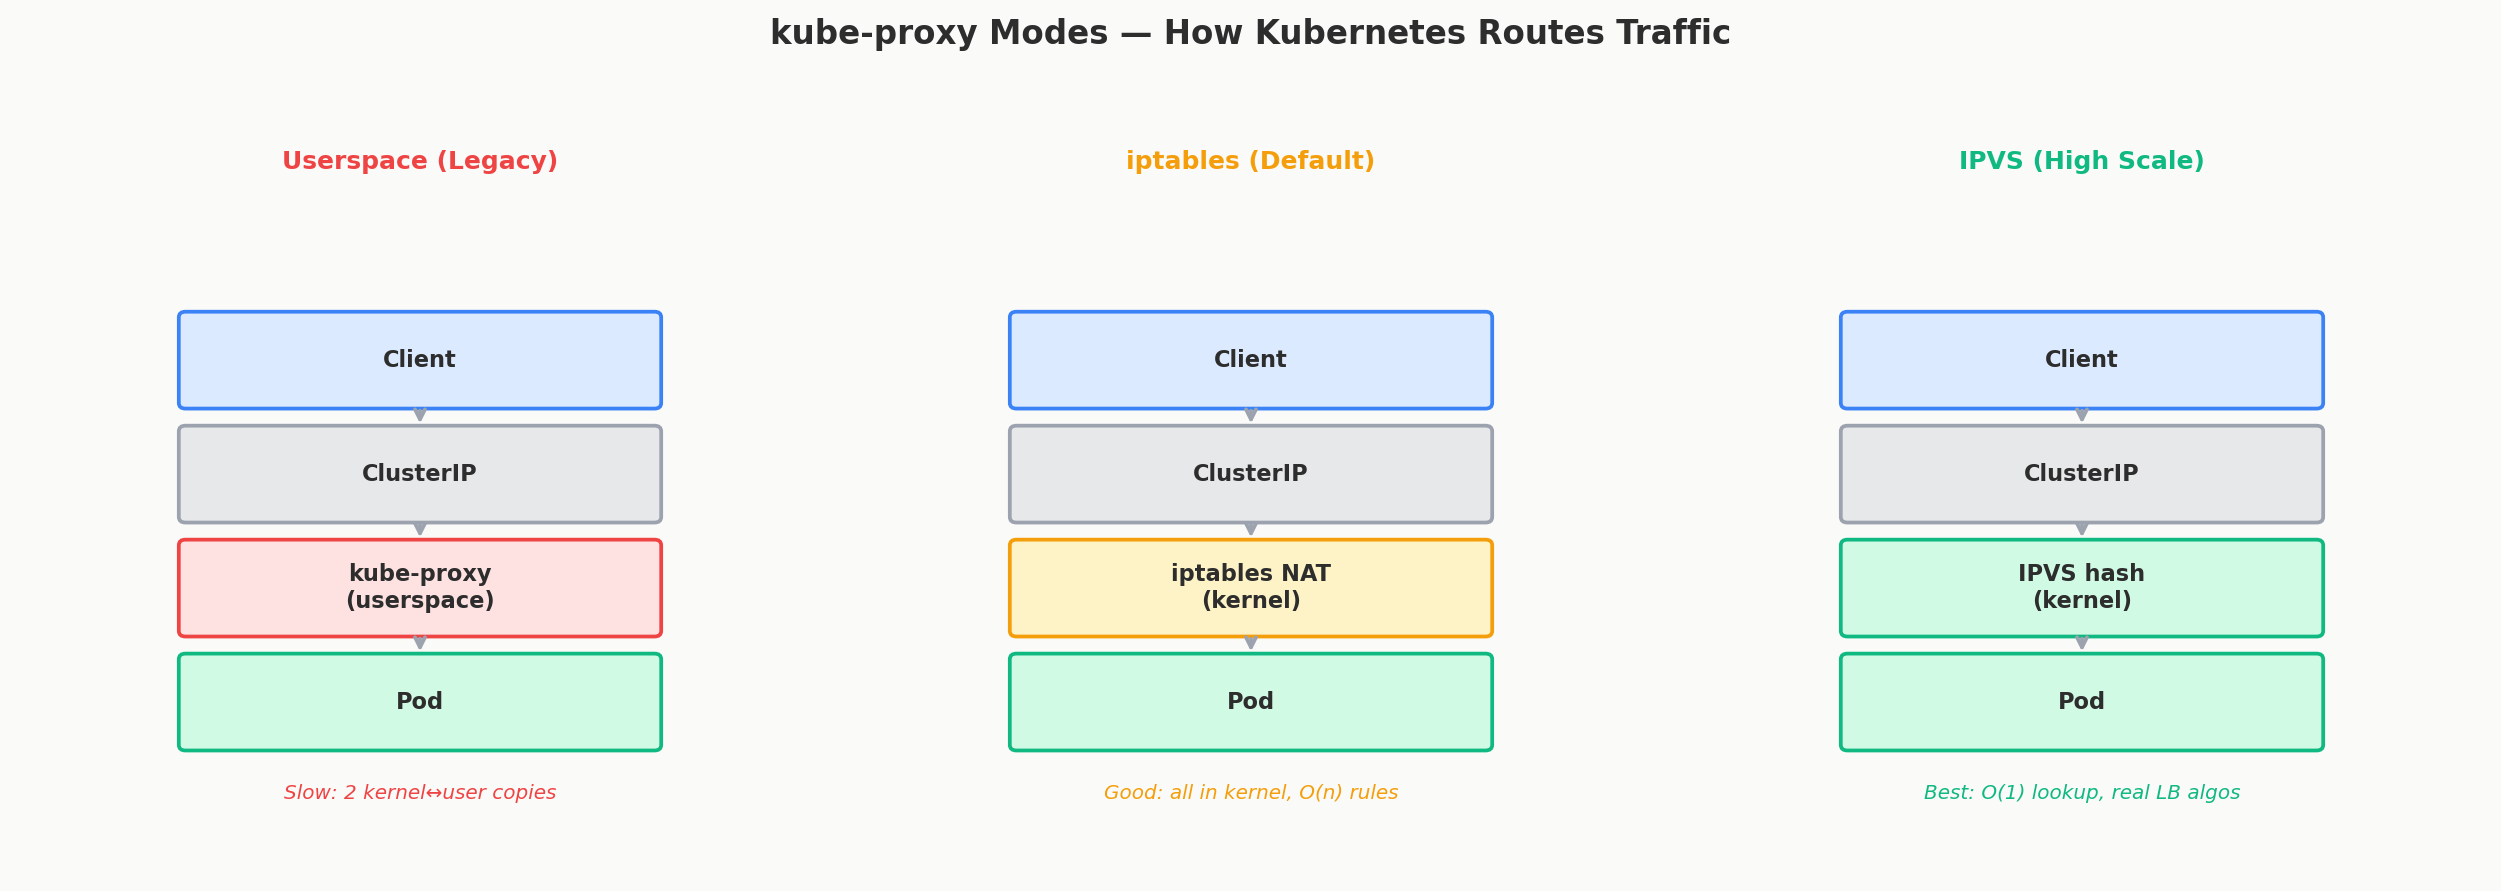
kube-proxy runs on every node in the cluster and is responsible for making Service IPs actually work. It has three modes, each with different performance characteristics:
1. Userspace Mode (Legacy — Don't Use)
The original implementation. kube-proxy literally sits in the data path as a proxy process:
Every packet goes through a userspace process — that means two kernel-to-userspace copies per packet. Slow and CPU-intensive. This mode exists only for historical reasons.
Performance: Terrible. Don't use it.
2. iptables Mode (Default)
kube-proxy programs iptables rules in the Linux kernel. When a packet arrives for a Service IP, the kernel's netfilter framework rewrites the destination address to a Pod IP — entirely in kernel space. kube-proxy isn't in the data path at all; it just manages the rules.
How it balances: Random selection. iptables uses probability-based rules — with 3 Pods, each rule has a 1/3, 1/2, and 1/1 probability in a chain. This gives uniform random distribution.
The catch: iptables rules are evaluated linearly. With 1,000 Services × 10 Pods each = 10,000+ rules. Every new connection walks the rule chain. At large scale (5,000+ Services), rule updates become slow (iptables does full-table replacement), and connection setup latency increases.
When to use: Clusters with fewer than ~5,000 Services. This is the default and works great for most deployments.
3. IPVS Mode (High Scale)
kube-proxy programs IPVS (IP Virtual Server) — a purpose-built L4 load balancer in the Linux kernel. IPVS uses hash tables instead of linear rule chains, so lookup is O(1) regardless of how many Services you have.
How it balances: IPVS supports real load balancing algorithms — Round Robin, Least Connections, Destination Hashing, and more. Much smarter than iptables' random selection.
The win: Connection setup time is constant whether you have 100 or 50,000 Services. Rule updates are incremental (not full-table replacement). And you get proper LB algorithms instead of random selection.
When to switch: When you have thousands of Services, or when you need Least Connections (for long-lived connections like gRPC streams).
Quick Comparison
| Userspace | iptables | IPVS | |
|---|---|---|---|
| Data path | Through kube-proxy process | Kernel netfilter | Kernel IPVS |
| Performance | Slow (userspace copies) | Good (kernel-space) | Best (hash-based lookup) |
| LB algorithm | Round Robin | Random (probability) | Round Robin, Least Conn, etc. |
| Scale limit | Don't use | ~5,000 Services | 50,000+ Services |
| Rule updates | N/A | Full-table replace | Incremental |
When to Switch Modes by Load
The decision framework is straightforward:
- < 1,000 Services: iptables is fine. Don't overthink it.
- 1,000–5,000 Services: iptables still works but monitor rule update latency. If
kube-proxyrestarts take more than a few seconds, consider IPVS. - > 5,000 Services: Switch to IPVS. The iptables linear scan becomes a measurable bottleneck.
- Long-lived connections (gRPC, WebSocket): IPVS gives you Least Connections, which prevents connection pile-up. iptables' random selection can create hot spots.
Beyond kube-proxy: Service Meshes
At even larger scale, some organizations replace kube-proxy entirely with a service mesh like Istio (built on Envoy). Instead of kernel-level packet rewriting, a sidecar proxy runs alongside every Pod and handles routing, load balancing, retries, mTLS, and observability.
This is L7 load balancing at the Pod level — much smarter than kube-proxy's L4, but adds latency (each hop goes through a proxy process) and operational complexity. Use it when you need per-request routing, canary deployments, or zero-trust networking between services.
Interview Tip
If Kubernetes comes up in a system design interview, mentioning "kube-proxy uses iptables by default, but at scale you'd switch to IPVS for O(1) lookups and proper LB algorithms" is a strong signal. It shows you understand what's happening under the abstraction, not just kubectl apply.